Etch-A-Sketch is a very simple 2D plotter which is limited to drawing a single unbroken line, of a single thickness and colour which is dark-ish on a silver-ish screen. To be able to plot a photo onto the Etch-A-Sketch we need to transform the image so that —
- the resolution makes sense for movements on the screen
- it is 1-bit, on/off only (no grayscale here)
- it can be drawn in one continuous line
Screen resolution
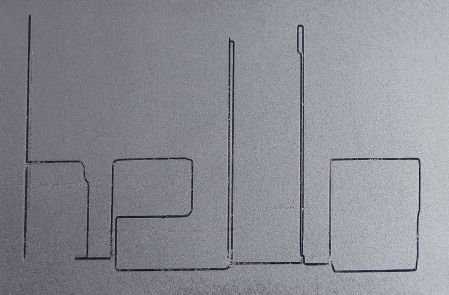
Once I had the basic control of the stepper motors sorted out the first step was to determine the resolution by drawing series of up-right-down-right-up-right-down-right patterns across the screen. By increasing and decreasing the length of the right portions I found the step size which when drawn drew what looked like two adjacent lines.
The resulting plotter scale was 25 — that is to step right by one pixel, we need to rotate the wheel 25 steps1. By drawing around the screen a max resolution of (240x144) was calculated for this scale.
The screen has a ratio of 5:3 so any other similarly scaled resolution will also work. Some examples below use a lower resolution of 100x60.

The input image is resized by scaling the dimension (width/height) which is closest to the target size, ensuring we don’t shrink the image smaller than the target in either dimension. The resulting image is then cropped to size.
from PIL import Image

t_width, t_height = (240, 144)
c_width, c_height = image.size

wr, hr = t_width / c_width, t_height / c_height

# Scale the dimension closest to the target.
ratio = wr if wr > hr else hr
target = int(c_width * ratio), int(c_height * ratio)

image_r = image.resize(target, Image.ANTIALIAS)

c_width, c_height = image_r.size

# Crop a rectangular region from this image.
# The box is a 4-tuple defining the left, upper, right, and lower pixel coordinate.
hw, hh = c_width // 2, c_height // 2
x, y = t_width // 2, t_height // 2

image_r = image_r.crop((hw - x, hh -y, hw + x, hh + y))
This gives us an image at the target size of 240x144, with no blank space.
We capture from the camera at a 800x600 resolution.
Finding some lines to draw
Before we do anything else we need something to draw. Because of the limitations of an Etch-A-Sketch that thing needs to be 1 bit (on/off) and preferably line-like.
The first thing I tested was the edge-enhance algorithms available in pillow since this was already a dependency. Unfortunately while it highlights edges, it doesn't have any noise-limiting and also produces regions of solid black. While these aren't impossible to draw with the Etch-A-Sketch they ain't pretty.
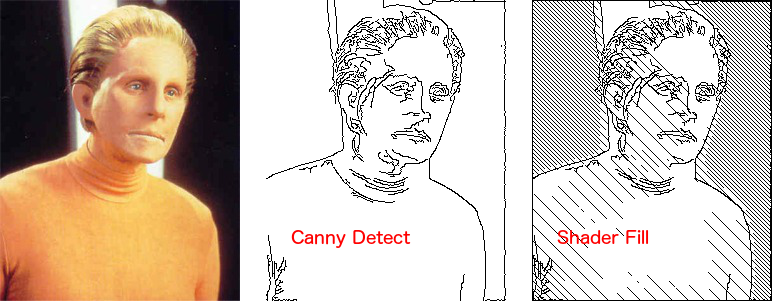
The best results were found from using the Canny Edge Detection algorithm in available in the Python computer vision library cv2.
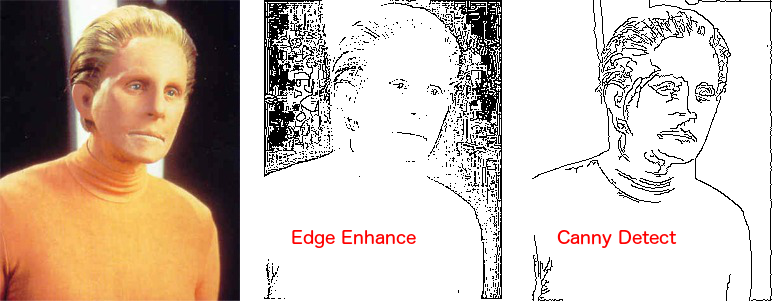
This adds another dependency (and one not particulary easy to install) but it picks out the edges nicely, producing a series of 1 pixel thick lines from an input image. The code to extract the edges from an image is shown below.
from PIL import ImageOps
import cv2
import numpy as np

gray = image_r.convert('L')

ocv = np.array(gray)
threshold1 = 200
threshold2 = 50
edgec = cv2.Canny(ocv, threshold1, threshold2)
edgec = Image.fromarray(edgec)
edgec = ImageOps.invert(edgec)
edgec
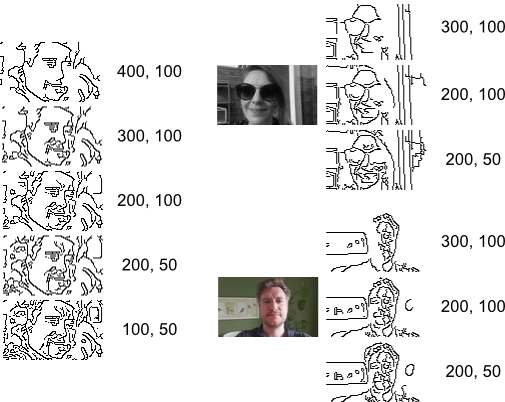
The values are the max and minimum threshold for local intensity gradient (change in image intensity) for something to be considered an edge. If something is above the max value threshold1 then it is considered an edge, if it is below threshold2 then it definitely isn't an edge. If it is between threshold1 and threshold2 it might be an edge, and whether it is is determined by whether it is connected to a pixel that is an edge.
But, to be completely honest, the above values above were determined through trial and error. They are pretty well tuned for both the type of input and the output scale.
If you want to experiment 200 & 100 also works well, producing sometimes neater images at the expense of detail/connectivity.
At this point we have a bunch of lines. What we need next, in order to be able to draw the lines on an Etch-A-Sketch, is to connect them all up.
To support developers in [[ countryRegion ]] I give a [[ localizedDiscount[couponCode] ]]% discount on all books and courses.
[[ activeDiscount.description ]] I'm giving a [[ activeDiscount.discount ]]% discount on all books and courses.
Continuous line drawing
To draw the entire picture with a single continuous line all regions of the image must be connected. I implemented two ways to do this, first using hatch-filling to increase the chance of lines connectin regions, and another which simply draws connecting lines.
The first of these happens at the image processing stage and is described below, the second occurs during graph-optimisation and is described in the next part.
Shader fill
shader-overlays with hashed lines. This adds both connectivity and depth.
fill_patterns = [
    np.array([[1]]),
    1-np.eye(16),
    1-np.eye(8),
    1-np.eye(4),
]
The input image, in grayscale, is lowered to 4 levels of brightness. These 4 levels of grey (from white to black) are then replaced with a different densities of hashed lines, producing the darkening effect on the screen, and hopefully connecting up some additional regions.
def line_fill(img, mask_expand=0):
    data = np.array(img)   # "data" is a height x width x 4 numpy array
    output = data.copy()

    width, height = data.shape

    for n, pattern in enumerate(fill_patterns):

        p_width, p_height = pattern.shape

        fill_image = np.tile(pattern * 255, (width // p_width + 1, height // p_height + 1))
        fill_image = fill_image[:width, :height]  # Drop down to image dimensions, so we map straight through.
        output[mask] = fill_image[data == n]

    return Image.fromarray(output)
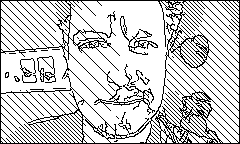
The resulting image should have the majority of the elements in the view connected and drawable by the Etch-A-Sketch. Regions of darkness in the input image are shaded, adding a bit of depth to the picture.
The downside with this shader-fill approach is that it creates a lot of extra detail to draw and can make busy pictures very noisy. An alternative which simply draws linker-lines between adjacent regions was also implemented, and is covered in the next section.
You can adjust the levels of brightness/shading by adding more entries to the fill_pattern list. Hatch patterns also work, although the Etch-A-Sketch draws them even worse.
Further optimisations
Placing hashed lines over regions of brightness doesn't help in those cases where there are isolated regions of darkness in the middle of an image, surrounded by light. To try and solve this the shader areas were also expanded to increase the chance of overlap. As we apply the darker areas after the lighter areas, the effect is to increase dark hatching.
from PIL import ImageFilter

def expand_mask(data, iters):
    yd, xd = data.shape
    output = data.copy()

    for _ in range(iters):
        for y in range(yd):
            for x in range(xd):
                if (
                    (y > 0 and data[y-1,x]) or
                    (y < yd - 1 and data[y+1,x]) or
                    (x > 0 and data[y,x-1]) or
                    (x < xd - 1 and data[y,x+1])
                ):
                    output[y,x] = True
        data = output.copy()
    return output

blur = ImageFilter.GaussianBlur(radius=2)
grayi = gray.filter(blur).convert('P', palette=Image.ADAPTIVE, colors=len(fill_patterns))
lined = line_fill(grayi, 4)
lined
The downside of this algorithm is that it can produce dangling edges over the edges of lines, which causes yet more noise (and stuff to draw). Once the linking-lines algorithm (later) was added, this optimisation became redundant and was removed.

What's next
We now have a processed 1 bit image, with (hopefully) the majority of regions in the image connected and able to be drawn in one continuous line. The next step is to work out how to draw this to the screen.
-
there is some give in the wheels, so when changing direction we also need to apply tracking corrections. ↩
Continue reading the Etch-a-Snap series with Drawing, Etch-A-Snap

